Thursday 30 July 2015

CCT Citrus


Time for our next challenge on the Cute Card Thursday blog, and this time out our theme is 'Citrus'.  Our sponsor is Aliciabel, please stop by the CCT blog for inspiration from the rest of the DT.

This is another old stamp, but one I don't think has ever been inked up! It's from Serendipity Stamps and I rather like the sketchy design, easy to colour in with my Copics, and the jug of lemonade was, I think, perfect for the challenge.  I've stamped onto a Marianne Design die cut circle and added real stitching around the edge with some variegated silky thread I've had for over a year and a day!  I had a couple of pieces of background papers in green and yellow so just added my faux stitch edging to them, then got to die cutting my embellishments.  Here's a close up:


I've die cut the flowers with the Marianne Design Mulberry paper then coloured with yellow and orange Distress inks.  When wet I've squished down the middles with a ball tool to give some dimension before fixing the little star gems in the centres.

Here's the dies I used:


The circle die with the stitching I used for cutting out my image is from set CR1248.

Thanks for stopping by to take a look - I have survived the dentist and in the event only had 2 teeth extracted, but still feeling pretty sorry for myself and not doing much other than watch tv or browse Pinterest .. .. I must try and do a little colouring today and get out of the dumps!


Monday 27 July 2015

My Snowman Friend


Good morning from a very windy Cornwall! although the morning is not quite so good for me as I was up most of the night with horrendous tooth problems .. .. so tomorrow afternoon I will overcome my fear of needles in my mouth and get my four lower incisors pulled out! Well, one final broke off a couple months back after a little accident last summer, and the others are all loose so should come out easy enough! and the pain in the jaw up by my ear might be due to a hair-line fracture from the previous incident .. .. and infection - so I may be absent for a wee while feeling very sorry for myself.  I do have my CCT DT cards made for the next few challenges so will try to get them ready to go.

Back to today's card then.  Another cute snowman from LOTV coloured with my Copics. I am looking forward to seeing the new Christmas designs that LOTV will be bringing out - some retail therapy might just help out!  Here's the card:


It's a simple layout relying on the pretty paper from the Marianne Design special Christmas pack for interest.  I've die cut a mat for my image, cut and inked a few snowflakes, and die cut the text, then kept things fairly flat with just 1mm foam tape to fix my image to the base and pop up the bottom snowflake - it should fit through the narrow slot at the Post Office.  The die cuts are all by Marianne Design, of course - Text from LR0225, mat from CR1248, snowflakes from LR0123, CR1225 and CR1226.

The new Christmas Card Challenge is anything goes so I can enter with my snowman friend.

Thank you for stopping by and hope you will come back again soon.  I will, if all goes well, be back on Thursday with my CCT card to share with you.

Sunday 26 July 2015

LIM & Snippets


What a miserable Sunday it is here in Cornwall, blowing a gale and misty horizontal fizzle (fog/drizzle).  So time to stay in doors after braving the elements with Izzy, and a quick card for the Less is More challenge that this week is to use Snippets as Diane from Pixie's Snippets fame is their GDT - so my card is a one for two entry! And as it is Chrissie's birthday, I took inspiration and made a girly Birthday card.

My base is a plain white C6 card that I've embossed with stars, just to add a little interest but keep it white .. .. then I die cut my pieces from oddments of shocking pink card, stamped the text (it comes with the Birthday die) and used snippets of Buddly Crafts digi papers to cut out the banner flags. Lastly, I couldn't resist adding little pink gems for a touch of sparkle!

The Marianne Design dies I used on this card:
Birthday - COL1349
Banner flags - LR0239 and the little ribbons on the end from LR0238 

The Creative Card Crew would like to see banners or flags for their challenge, so I can enter my card with them too!

Thanks for stopping by to take a look, hope you will come back again soon!

Saturday 25 July 2015

July Rudolph Days!


It's the 25th of the month so the start of another Rudolph Days challenge on Scraps of Life blog. Anything Christmas goes, and you have until the end of the month to enter.

I notice from my files that this is the 7th card I've created with this LOTV Mr Snowman stamp!  He is so easy to colour and this time out I've done him in red and blue to match the odd pieces of my Marianne Design papers - I am trying to use up the left-overs.

Here is the card:

Blue textured card for the image mat and paper mat, with my faux embossed stitching around the edges.  I die cut the icicle border to hide the join in the papers, found some paper flowers that had come free in a magazine ages ago so spritzed and tweaked them then layered up with a blob of pearl maker pen in the middle.  Unfortunately the first blob flattened out a lot, so I went back and added another on top.  More blobs on the die cut holly sprays and lots for snow behind my snowman.

I used these Marianne Design dies:
mat for image - CR1248
icicle border - LR0135
holly sprays - LR0244


I couple more challenges I can enter with my card: Die Cuttin' Divas theme is Christmas in July, and Holly Jolly want your inspiration to be a Christmas song, well Mr Snowman, bring me a .... is going round my head now!

Thursday 23 July 2015

CCT Pets

A very simple card from me this week for my Cute Card Thursday DT project, our theme is pets and we are being sponsored by Bugaboo Stamps who kindly let the DT play with some of their digi images.  Unfortunately my printer is still playing up so I've had to revert to 'ink and rubba', but please go take a look at what the rest of the team have created.

I have been rummaging again .. .. and found my box of Sugar Nellie stamps that I've not used in a while.  This cutie seemed appropriate with the weather we have been getting, and sharing an ice cream with a spaniel seems the obvious thing to do!  Izzy's favourite is strawberry so I have made a C6 tent fold strawberry card with little scraps of digi papers and a plain background embossed with the Swiss Dots CB folder.  The image is called 'where's mine' and I think is meant to be a little boy, but I've coloured with my Copics for a tom-boy.  Not much else to tell you, my die cuts are made with Marianne Design dies, here's the list:

lace border across the top - LR0161
flowers - COL1323
leaves - CR1245

Sugar Nellie have a monthly blog challenge in the Sugar Bowl, so I can enter my card with them.  I must get more of SN stamps inked up, I do like the Country Cousins designs as they were called when they first came out.

The Corrosive Challenge is to use dies so another one I can enter.

Thanks for stopping by to take a peek at my card, and hope to see you again soon!

Saturday 18 July 2015

CAS Christmas


When checking my blog favourites yesterday, I saw that Christmas Stampin' All Year Long wanted CAS creations for their latest challenge.

Coincidentally, I've been adding pictures to my CAS Christmas album on Pinterest so plenty of inspiration there to choose from.  I recognised the stamp used on one of the cards as being very similar to one from a Viva Decor My Paper World set I got at Buddly Crafts, here. In fact, it's on several of the cards in my album although it appears to be a SU! Santa Sleigh stamp instead. The difference is the sleigh is blocked out and you get an extra reindeer on the SU! set, as far as I can tell.

Anyway, using my Paper World set, I've stamped the sleigh then added the starry background and the text along the bottom of my base card.  I was inspired to use the layered star idea and cut mine from Marianne Design Craftable die set CR1226 in a soft blue textured card to match the blue Momento ink I've stamped with. I fixed the star to the card with 1mm foam tape so it's only slightly raised, and I couldn't resist adding a couple tiny gems to the line of text - well what's Christmas without a touch of sparkle!

Christmas at Sweet Stampin' theme for July is 'Oh deer' so anything with a deer on it means I can enter my card with them too.

I'm quite pleased how this card turned out, and how quick it was to make .. .. it took me longer to get a decent photo and to tweak it so you could make out the details.

Thank you for stopping by, I'm off to enjoy the garden while the sun is shining, although I'm drawing a line at cutting the grass even if it is ankle high in places.  How is it some areas are lush and green and other areas hardly grown at all, and that's not because Izzy pees on them, well not all of them anyway!  Perhaps it's something to do with the patches of tarmac I find when digging the borders, it was an old WW2 air base after all! Whatever you are doing this weekend, I hope you have fun and the sun shines on you.

Friday 17 July 2015

Marianne Design Happy Holidays Special

I got a Marianne Design Special treat recently over at Budly Crafts, this is the new Marianne Design Special, Happy Holidays - find it here. Another bargain at only £5.19.

You get a pack of A5 Christmas papers, a cling stamp set, a roll of pretty paper tape, and the most gorgeous ecru lace imaginable!  I have a thing about lace, some people collect papers that they can't imagine cutting up, with me it's lace!

However, I did manage to take a very deep breath and use a tiny strip of it on this card:
I used a C6 kraft card as my base then matted a piece of paper from the pack with red card stock and added my signature faux embossed stitching around the edge, plus inked with a Jumbo Java brown chalk ink so the stitches stand out.

The image I stamped with a Potters Clay Momento ink then added a touch of colour with my Copics, although you could leave it uncoloured and it would still look good.  I added a soft creamy Wheat chalk ink around the edge of my image to take of the whiteness off the stamping cardstock, and finished up with the Platinum Stickles.  Then I cut a red mat for the image to sit on, before mounting each layer with 1mm foam tape onto the card.  The ivy sprays are cut, inked, snipped and Stickled to frame my image and I made the poinsettias from MD Mulberry paper died with Red Brick Distress Re-inker.  Here's a close up of the details:

And here's the Marianne Design products I used, all available in the Buddly Crafts store, in addition to the ones in the Happy Holidays special offer set.

Red mat from die in set LR0235 with the embossed areas inked in dark brown chalk ink so they show up.

The Ivy circle is CR1213, I've just snipped it up and used the pieces to create the frame.

Poinsettias from mini set LR0142 cut out of Mulberry paper RB2219.

It's another card for Mum to send out and the flowers will squash down for the post but hopefully pop back up on arrival! The Mulberry paper is soft but still holds it's shape well even after being spritzed with water and dowsed in ink!

I'm entering into Pixies Playground snippets challenge week #185 as I have used snippets of card for my ivy spray and flowers, plus just a snippet of my precious gorgeous new lace!

And the new challenge starting today on the Jingle Belles blog is for an Old Fashioned Christmas, perfect for my card!

Thanks for stopping by, and hope to see you all again soon.

Thursday 16 July 2015

CCT Water


It's time for our next challenge at Cute Card Thursday, and this time it's 'Water' - hopefully not too much falling out of the sky today!  Our sponsor for this challenge is  Whimsy Stamps, please stop by the CCT blog to read all about the prize and see what the rest of the DT have created.

A few weeks back I was inspired, after watching lots of mixed media clips on YouTube, to fish out my old Stewart Gill paint stash.  Now some was so old that the paints had dried up and had to be binned, but I did have plenty of the pretty Pearlescent and translucent Alchemy paints in shades of aqua, white and some pink, and also a few metallics that were almost usable! So, in order not to waste card I used a piece from the middle of my chocolate mini-roll pack (after eating the top layer of mini rolls!) and set to sloshing on the base colours.

The paint dries quickly and cleans up with water, so no hanging about thankfully.  I then fished out some old rubber stamps, one that looked like rising bubbles I stamped over the background with a dark aqua paint, then infilled the bubbles with white pearl paint then I added some light green squiggles from the bottom up to look like weeds, or so I thought!  The other stamp I used is a sort of umbellifer seed head and I used a metallic paint to stamp that, although the first generation is a bit thicker than I would have liked (bottom left) but better second generation top right.  I then got to flicking some aqua paint and adding aqua dots with a thick Adirondack pearl paint in the colour stream.

Next was embellishing, and first up was to use the aqua micro beads I've had in my stash for a decade!  I used dries clear glue to fix them along the bottom but wish now I had used Glossy Accents as some are coming off around the edge so I might need to redo.  You can just make them out at the bottom of my dragonfly close up picture.

The dragonfly is another old stamp, bottom layer stamped onto the lavender vellum is embossed with silver the top layer embossed with an iridescent powder.  I only used the wings on the top layer to add dimension, fixing them to stand proud with a little silicone glue. I've added fine aqua glitter to the segments of the body and see some has stuck to the wet glue around the beads too - I like that!

The flower is the one I made a few weeks back from the large Marianne Design LR0122 poinsettia dies, you might recognise it from here.  I've dabbed on some of the pink pearl and translucent lavender paints then fixed a gem to the centre.  The 'leaves' are MD die LR0192 and I've added glitter to the ends of the fronds..  Lastly, I managed to get a couple of tiny butterflies punched out of the last piece of lavender vellum and gave them glittery bodies too.

I had fun with this creation, and really want to have more time to play with mixed media stuff, although I do like to keep things pretty and for the moment am just using my bits and bobs to make cards .. .. more to share soon!

Crafty Cardmakers also have water as their theme this week so I can enter my creation with them.

Thank you for stopping by, and see you again soon with a couple of little cards I've made with my painted backgrounds.

Wednesday 15 July 2015

Marianne Design Divas in Circles!


This is my DT card for the new Marianne Design Divas challenge to use something circular or create a circle card.  Our sponsors this time are Buddly Crafts and, of course, Marianne Design.  Please stop by the blog to see the gorgeous things my fellow DT have made and see what the prizes are for this challenge.  Take it from me, my card is circular, it just looks oval after I'd cropped the picture!

As Buddly Crafts are sponsoring, I'll link up to them for the MD products I've used so you can go shopping if you like .. .. my one big problem is I love the MD sparkle paper (actually card) and can't seem to find it on the shop site, so guess it's out of stock, just hoping it comes back in soon as I use lots for Christmas creations!

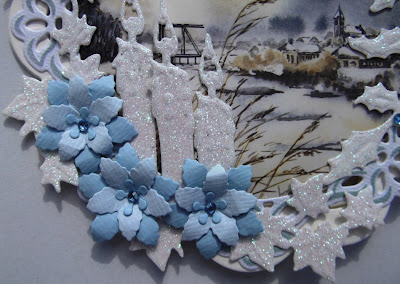
My base card is cut with two layers of cream card using die LR0112, and although I've embossed the edges, I didn't do any inking.  On the next layer cut from textured white card with LR0141, I've inked the embossed edges with a smoky blue chalk ink. Before fixing the white layer to the cream I cut out the picture from Mattie's Winter 1 cutting sheet MB0146 with a circle die and glued it behind the white frame.  In the past I had trouble with glue and the pictures so to be on the safe side I just glued around the edge this time - seems to have worked. MD have some beautiful cutting sheets and they only cost pence so great if you don't have time to colour a picture, or like me most of your stamps are cuties and you want to make something more traditional - although there are cute cutting sheets too. I am going to be adding to my collection, especially Christmas pictures as they will be great for the cards Mum sends to some of her older friends who like a more traditional style.  If you go take a look you will see that the bunny picture I used the other day is from the same sheet, and I am cogitating over what to do with the robin pictures!

With my basic card layered up flat, it was time to embellish, but I didn't want anything sticking out too much and hopefully this will go through the narrow slot at the Post Office.  The text is cut with the new die CR1327 and I've inked the embossed areas so the text shows up from the cream card, and I have popped it up a little with 3d foam tape.

 The holly sprays, ivy sprays and the 3 candles are all cut from the MD sparkle paper (actually card) using dies LR0244. LR0206 and LR0243 respectively. The mini poinsettias are cut from two colours of blue card stock with the mini poinsettia die LR0142.  To finish off I've added the blue gems, another real sparkler in the right light!  And because I've let the ivy leaves overhang at the bottom of the card, it helps to balance the card so it stands upright.


The new Papertake Weekly challenge theme is 'dont be square' so perfect for my circle card!

Thanks for stopping by to take a peek, and love to see you again soon!

Thursday 9 July 2015

CCT Ladies Only


oh my the internet is slow in Cornwall now .. .. all those holiday makers trying to link up back home .. .. so although this post is for Cute Card Thursday, it's actually Wednesday today as I'm typing and goodness knows how long it's going to take me to write it all up.  Plus, I have extra pictures to share - hopefully I'll get it done eventually.

So, we are celebrating Ladies Only on CCT this week, and our sponsor is All Dressed Up! please stop by the blog to read about the prize and see what the rest of the team have created.

I've inked up my LOTV Coffee Time stamp and coloured with my Copic pens, although in my close up pic it's looking a bit washed out.  I've used another piece of my SU! special paper, same as last week, and gone to town with flowers.  First up though, here is the card:


I've edged with my embossed faux stitching although it's hard to make out, and I left off a sentiment so I can use if for any special girly occasion. The die cuts are Marianne Design, except the SB scallop cream mat.  The pink pearls on the cream mat are made with a new Viva Decor pearl pen, and yes they do seem to be self levelling so no nipples on top although with the light catching them it looks otherwise!  The flowers are made with MD mulberry paper and coloured with a couple shades of Momento pink die ink, here's a close up of them:


The darker flowers are created with two layers of die cuts, the paler ones with just one layer, and the tiny buds are again one layer then snipped into the middle and rolled up - fiddly but I think they look ok.  I took an emery board to the leaves to highlight the edges and the central vein.  Here's the dies I used for the flowers:

So, the pale flowers are made with the bigger petalled die CR1204, and simply inked, spritzed and squished with a ball tool so the petals come together. Once dry I tweaked a little and added the pearl in the middle.

For the darker flowers cut with CR1201, I inked just the edge of the petals, then spritzed on the back so the ink bleeds a little, squished and then when dry layered up two and added the pearl centre.

The tiny buds cut with LR0160 I made from the paper that I already coloured pink as it's easier to do that way around .. .. then snip into the middle, lightly spritz with water and roll up tight.  When dry they come undone a bit so you might need to re-roll if you want tight buds, but I actually like the loose look!

I hope you like my card today and the picture of the dies has helped - let me know if you prefer to see a list or a picture.

Creative Inspirations are wanting girlie creations this week so definitely one to enter! The In The Pink new theme is floral, along with lots of pink, and a picture of pretty roses in a tea cup .. .. inspiration certainly! and I think my card fits that theme but not sure if it's pink enough, hope so.

Sunshine is back in Cornwall today so I need to finish off tidying the garden and pruning/pulling out some of the spring and early summer flowering things that have gone over to let the light in for the things still to flower that seem to be hiding underneath.  I am beginning to realise that either I'm getting too old or the garden is getting too big .. .. I think more permanent shrub planting that just needs an annual prune might be the way to go, before my back goes!

Saturday 4 July 2015

Winter Wishes

I have a Festive Winter card to share with you on a lovely sunny Summer day! Sorry for the wonky picture, and actually it is a bit wonky in real life too .. ..

The base card is cut with the frilly #10 die and I've cut the patterned layer with Marianne Design patterned paper from the Special Nautical pack I recently purchased.  I thought that this subtle blue grey paper would suit lots of occasions and it does match the tones in the MD bunny picture.

I've inked the edges of the paper with Pumice Stone DI, and used it on the embossed areas of my pine cones and twigs as well.  The pretty circle mat and the lacy snowflake are cut from the MD sparkle card, as is the top layer of the 'winter'.  The holly leaves I cut from the cream card, but added Stickles to bling things up, and added touches on the fence, twigs and pine cones, it's a lovely sparkly card in the right light!

The Marianne Design die sets I used on this card are:

circle mat - CR1251
fence - CR1288
pine cones and twigs - LR0286
holly spray - LR0244
snowflake - LR0327

Just a couple of challenges I can enter with this Winter/Christmas creation:  Winter Wonderland is all that glitters - lots on my card, and it's an anything goes theme with the Die Cuttin Divas.

thank you for stopping by to take a look at my sparkly Winter card on this beautiful sunny Summer day!  I hope you are enjoying some sunshine this weekend too.

Thursday 2 July 2015

Mmmm Cake!

This week on Cute Card Thursday we are loving cake! Well, who doesn't .. .. so please share your delicious delights with us.  Our sponsor for this challenge is Nikki at Bunny Zoe's crafts, please stop by the CCT blog to read all about it and see what the rest of the team have created.

For my card I've inked up one of my LOTV girlie stamps, called cupcake I think, and perfect for the theme.  She's coloured with Copics then I've added clear glaze to the cherries on top of the cakes and Stickles to her petticoat.  Here's the card - I've hit the auto bright button so it's now too bright, but I thought my little preview was looking dull - somewhere I'll figure out how to get a happy compromise between the two .. ..


The papers are some of my specials by Stamping Up! and although I love them, I've told myself that I have to cut them up before I can buy any new gorgeousness .. .. ah well!  The flower is another one I made by painting the die cut MD daisies with Twinkling H2Os, then a little die cut leaf spray and butterflies finish things off. I didn't want to add too much in the way of embellishments and cover up the pretty paper, so I sat on my hands for this one!  

I used dies from these Marianne Design sets:

pink doily mat - CR1201
ivory doily mat - CR1248
ivory border mat - CR1250
daisy flowers - LR0106
leaves - CR1245
butterflies - LR0261

The Stampavie and More challenge is to use doilies, I have two doily mats behind my image so hope that counts.

Thank you for stopping by to take a peek at my creations, and hope you will call in again soon.  Enjoy your day, keep cool (hey it's raining here in north Cornwall!) and keep crafting!