Tuesday 31 December 2013

Favourite Five Christmas Cards from 2013

I am a little late in joining in Debby's fun this year and sharing my Favourite Five Christmas cards - and hopefully will make it with my Favourite Five Creations from 2013 as well.  With family visiting, staying and needing to be fed, I've not had time to spend on the pc, but things should gradually start to settle down now, although we still have lots of DIY snagging jobs that need to be completed and I am determined that by the end of 2014 we should be all spick and span and tidied up!

Looking through my 2013 Christmas collection on Pinterest (makes life so much easier with a folder designated for the year's Christmas creations) I've selected my Favourite Five, so here is number 1 created with a Lili of the Valley stamp coloured with my Copics and finished off with glitter.


I was able to get a set of Go Kreate large dies that would go through my old Cuttlebug and give me fancy shaped cards, and of course my Marianne Design die cuts with the little mini poinsettias from a couple of years back that are so very useful and more than paid for themselves, together with new leaves and a mix of new and old snowflakes.  I have been trying to be a little bolder with my colouring this year so the mix of red and blue that is still popular this year meant I could use up some of the previous year's stash.


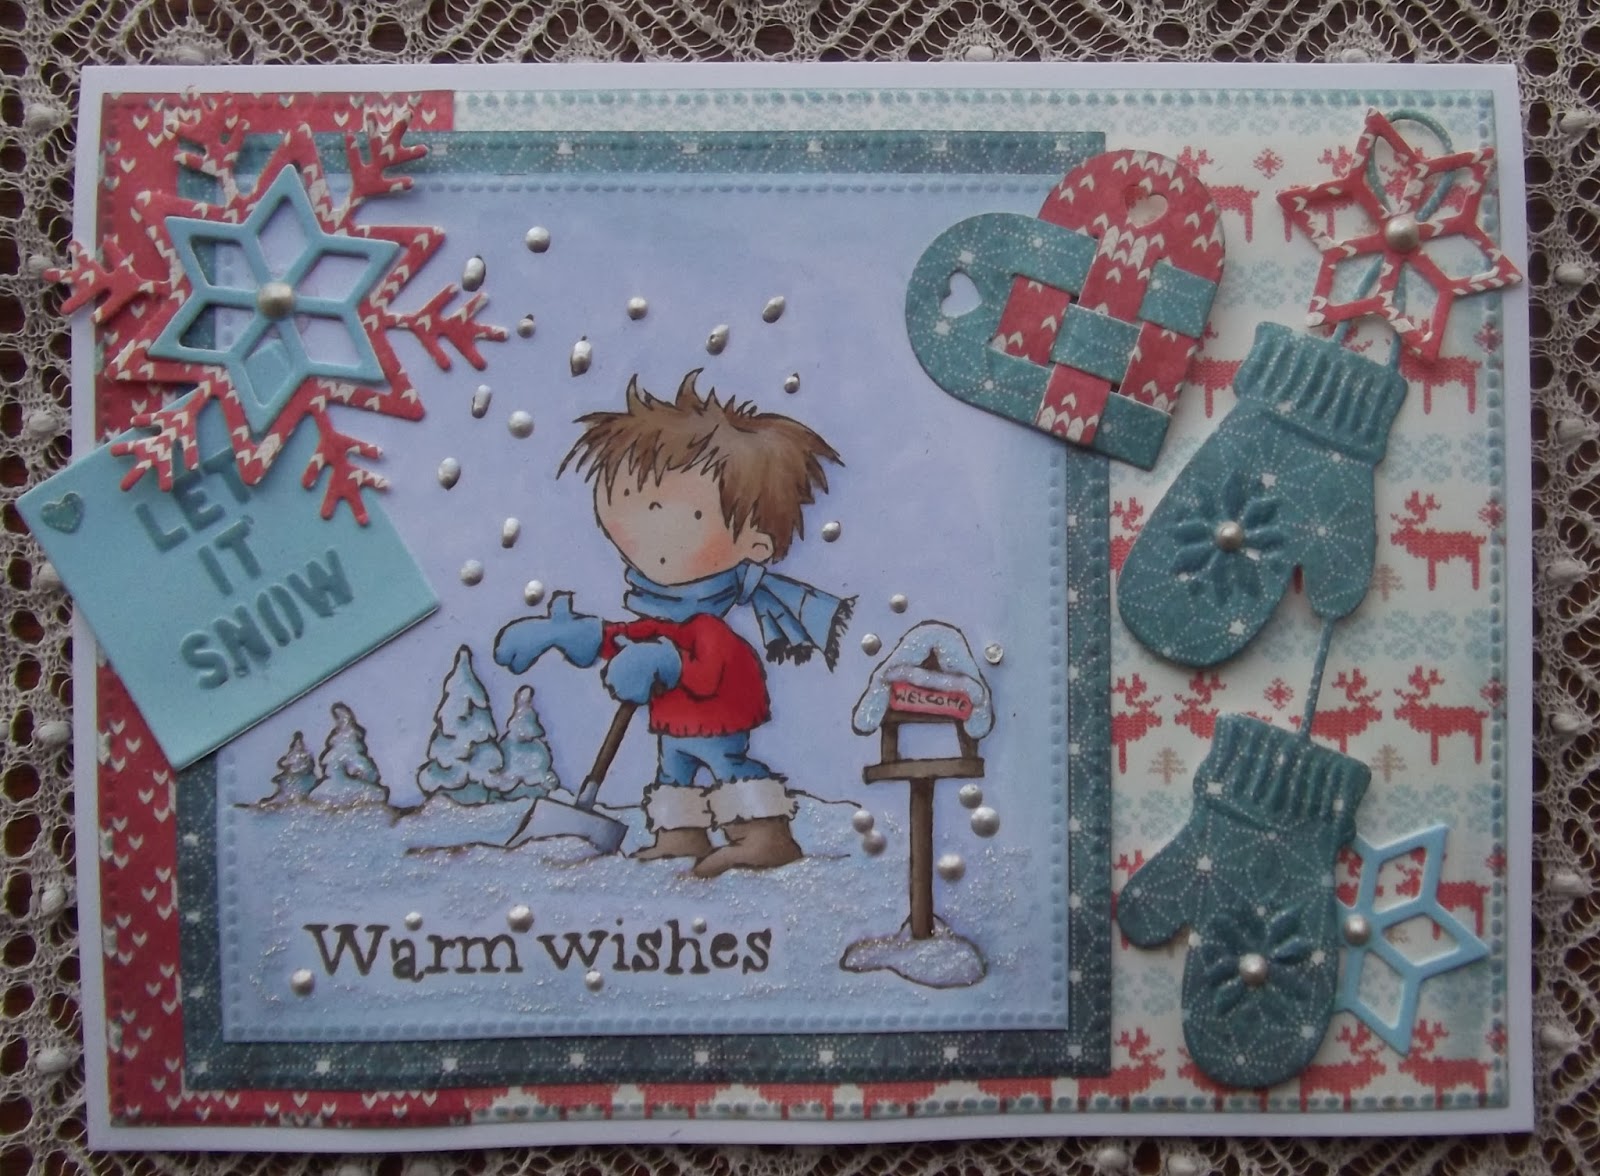
My second card stays with the red/blue colour mix thanks to some freebie magazine papers by Nitwits and a little bit of false blanket stitching - I discovered felt craft in 2013 and it's obviously been rubbing off on my cards.


The cute little girl image is a digi design by Sylvia Zett and available at Wee Stamps.  I've had problems with my printer all year so haven't been able to play with my beautiful Wee digi images as much as I would have liked, and this little Wee Berry has come off the printer larger than expected, so I coloured her with my Copics and fussy cut her out.  The embellishments are yet more Marianne Design die cuts with little pearls to finish things off.

For my third card I've chosen another stamp from Lili of the Valley that I treated myself to this year, again coloured with Copics and using more of the freebie NitWits patterned papers


This was my DT card for Cute Card Thursday's square challenge and my attempt to do a 'less is more' kinda design - so virtually no embellishments! Oh I could have chosen any number of my LOTV creations in my Favourite Five, together with Wee images they are probably my favourites!

And for card number 4, a design with no image, just die cuts, paper and ink, something that I've been doing more of this year, but don't get me wrong I still love my colouring in!


I'd had the Marianne Design stocking die for quite some time but hadn't figured out how to use it.  The papers are from an old K&Co Classic pad and work quite well, I think, for this shabby chic style I've created.  I've used a mixture of old and new MD die cuts and particularly like the new pine cones that come with the twigs.

Finally, number 5 is another die cut creation with my Marianne Design dies, and a new to me Darice embossing folder that looks like cracked ice


I struggle with the vintage style so was pleased how this turned out.  The reindeer head and pine cones were cut from dark brown HOTP card and distressed with an emery board - a different effect from being inked and I'm very happy with the result, of course now I need to find a UK stockist of HOTP card, it's smoother than Coredinations and also thinner, but that makes it easier to work with the dies especially when layering, inking or distressing.

Well that's my Favourite Five - I'm off to visit Debby and add my selection then wander about some of the other entries looking for next year's inspiration to pin onto one of my Pinterest boards.

Monday 30 December 2013

Last minute cards!

Well Christmas is over for another year, and soon it will be New Year and time to tidy away all the festive decorations.  I hope you all had a wonderful Christmas time with family and friends.  Here it was good to see the family, but with a few hiccups along the way .. .. hopefully all will be sorted out and 2014 will turn out to be a wonderful year for our family.  

I had tidied all my craft stash away then Mum needed a very last minute card to send to a neighbour she hadn't planned on .. .. so out came the festive bit box and here's my last festive card for 2013.  The paper is from Marianne Design and I just inked the edges before sticking down on a cream base card.  I already had the Marianne Design die cut pieces and the text, a Serendipity stamp, stamped out in green ink, so all it needed was the red berries adding and a little double red bow.  I think that with all the detail in the paper it didn't need much else, and besides there wasn't time to fiddle fart about!

These are the Marianne Design dies I used:
holly spray - LR0244
pine cones - LR0286
text mat - LR0180

At the Christmas Card Challenge blog it's anything goes, and Crafty Hazelnut's Christmas Challenge is raring to go again and asks to see either your first 2014 Christmas card creations, or some that you haven't yet shared from 2013 - mine is the latter!


Friday 13 December 2013

CAS Christmas Robin

I know it doesn't look like much, and I do struggle with the CAS concept - but Mum needed a card PDQ so this is it.  I already had the kraft lacy mat cut out, and the little Nellies Choice robin stamped and cut out too so it was simply a matter of colouring him with my Copic pens, making a square white base, stamping the text and sticking the layers together.

I still have to make her a couple more - I tell you she gets more cards than I do these days!  So, although the germs are winning the battle, I'm not going to let them win the war and will soldier on .. .. I still have to get to the post office with my own cards and the fridge is looking decidedly bare of lacto free goodies for me.  Perhaps a breath of fresh air will do me good this afternoon .. .. and although Padstow Tesco's isn't the greatest, I can probably get what I need and it is only 15 mins drive away .. ..

The Papertake Weekly challenge theme is for Christmas creatures - robins fit that bill!

Will catch up with commenting and blog hopping when I get back.

Thursday 12 December 2013

Christmas Catch Up at CCT

This week on Cute Card Thursday we are playing Christmas Catch Up and our sponsor for the challenge is Whiff of Joy.  Do stop by the blog to read about the prize and see what the DT have created.

My card is one that thankfully I had made last week .. .. the pesky germs are messing me about and I'm struggling again.  I thought yesterday I was on the mend and managed to finish filling and rubbing down the small area of skirting board where the sideboard will go, and I even made some buns.  But, the buns are not very nice and the bugs hit me back hard in the night - or I've got a different lot knocking me for six.

Anyway, as I said, thankfully I had already made this card with sweet Don shoveling the snow and a couple of extra stamps from the winter scenery set, coloured with my Copic pens.  I've used the Marianne Design Wintertime paper bloc again and cut out various MD die cuts to embellish.


Here's the card.  I've used a soft blue chalk ink to highlight the embossing on the die cuts and around the edges of my papers and image, then finished off with Stickles and pearl drops for the falling snow.

These are the Marianne Design things I used:
Wintertime paper bloc - PK9100
to create the faux stitched effect - LR0161
Don shoveling snow stamp - DDS3337
Don & Daisy Winter scenery - DDS3331
Warm Wishes stamp from a MD freebie in a magazine last year (came with Don ice skating)
mittens - CR1255
snowflakes - LR0124
Scandinavian heart - CR1228
Let it Snow label - LR0187

Now to challenges I can enter with my winter scene: Moving Along With The Times are looking for a Winter Wonderland, Crafty Little Fairies' theme is Let it Snow, and so is Christmas at Sweet Stampin', Incy Wincy and Craft Your Passion.

I still have the 2nd quickie CAS card to share with you so will try and sort that out for tomorrow, until then it's back to the Lemsips.

Tuesday 10 December 2013

A Christmas quickie!

I am full of germs and feeling sorry for myself, but things need doing so I'll have to be a brave little soldier!  Mum said she needed two more cards to post so I've made a couple of quickies, here's the first.

I had already planned the card but would have added more embellishments, but with the pretty busy patterned paper by Marianne Design and just the one die cut MD snowflake, I think I did ok!

The snowman is a LOTV stamp that sees ink every year .. .. he really is the best for a quick and easy card.  I've coloured with my Copics and then added glaze to the baubles, but of course you can't see that in the picture!  The text is, I think, a digi from Cuddly Buddly - I found a half page of them printed out in my Christmas bit box so just punched out this one and added Copic colours to match the image.  I finished off with Stardust Stickles for snow (still wet in the picture but I need to take it while still daylight).

If you are following my Gluten Free page, I've done a quick update with a picture of the latest cake I made, a spiced honey cake - yummy!  I'm sticking to the GF and lacto free and must say that I do feel better for it.  Certainly the foggy head is greatly improved, and my poor tummy is not quite as tender, and I rarely get the acid indigestion and reflux these days, but I do still get the bloating and farting!

I digress .. .. back to the card and challenges I can enter:  at the Corrosive Challenge it's anything goes, and the same at Created with Love.  I'll share my next Christmas quickie with you tomorrow!

Friday 6 December 2013

Sinterklass Candy


December 6th is St Nicholas' Day, a time for giving gifts and in Holland it is the traditional birthday of Santa Claus!  To celebrate Marianne is giving away this little package of loveliness - just go to the Marianne Design Challenge blog, translate the page into your own language and do what is says!

Well you know how much I love my Marianne Design Dies and the papers too, and what could be nicer than to Celebrate with Cup Cakes, Coffee, and Cafe pretty papers and Create something with these Cute Craftables and Creatables to share with my Crafty friends.  Oh, and if I win, as I already have the Cute Cup Cake die set I'll be happy to pass it on, along with a Creation.  Ceeeee!

Thursday 5 December 2013

CCT Eternal Flame


Our challenge this week on the Cute Card Thursday blog is titled 'The Eternal Flame' and as always we are looking forward to seeing what you make of our theme, with different interpretations from the Design Team for your inspiration.  Our sponsor for this challenge is Bunny Zoe's Crafts, stop by the CCT blog to read all about the prize.

As I had already made a candle jar a couple of weeks back, I made a card with the darling little Daisy holding her own flame.  The stamp is from Marianne Design and I added to it with some of the scenery from the Don and Daisy Winter collection, coloured with my Copics, adding lots of Stickles for the snow and Liquid Pearls for the falling snow.


Here's the finished card.  I've used papers from Marianne Design and of course lots of MD die cut pieces from a soft pearl paper that shimmers nicely under the lights but isn't showing up in my picture.

Here's the list of Marianne Design products I've used for my card:
Wintertime Pretty Paper pack - PK9100
Daisy with candle stamp - DDS3325
Don & Daisy Winter scenery - DDS3331
red fancy cut circle mat - LR0141
snowflakes - CR1225
flower - CR1204 with red centre from the mini poinsettia set LR0142
mistletoe sprays - LR0189
fronds - LR0227

The Fab 'n' Funky challenge is for a touch of frost - to create a snowy scene or have frosting on your card - I have done both!  Totally Gorjuss are also looking for snowy creations so one for them too.

Tuesday 3 December 2013

Christmas Magic


Another Christmas card to share with you today, and another with the Classic K&Co paper pack - it's the 12x12 size and seems to last forever, and even though I love the papers it is about time I used them rather than leaving them in a box in the cupboard. I have to downsize my craft stash so it's going to be use it or loose it to the charity shops!

Back to my card then, I have stamped a greeting by Serendipity Stamps onto the pretty Marianne Design die cut circle and inked to give definition to the embossed areas and the edges of my layers too.  My decoration is created from various other Marianne Design die cuts then finished with pearls.  Here's the list:

fancy circle - LR0168
flower - CR1202 & LR0160 for the centre
leaves - LR0117
little deer and little tree - COL1330
bigger tree tucked in behind the circle - LR0136
pine cones and branches - LR0286
snowflakes - CR1256
faux stitches on cream layer - LR0161

The Created with Love blog challenge is Christmas, so I can enter my card with them.

Thursday 28 November 2013

Anything goes, but not cake!


This week on Cute Card Thursday it's an anything goes theme, and our sponsor is Rick St Dennis, do stop by the CCT blog to read about the prize and see the DTs inspirational paper crafts!

Well, I didn't get time to create something from paper, but I did have a very successful day baking on Tuesday .. .. sadly this gluten free and lactose free coffee and walnut cake has now disappeared! It's a recipe from the DK Gluten Free cook book and I just substituted the lactose free buttery spread for the butter in the recipe.  The only slight problem is that the spread is softer than butter so the cake needs to be kept in the fridge or the icing will melt. Yesterday I had the dogs in the morning, well only one at a time as they took it in turns to visit Debby, my dog grooming neighbour, for a cut and blow dry.  Then as soon as they were done it was my turn, but not with Debby .. .. I did go to the local hairdressing salon!  When I got home, Jason was here busy with DIY jobs and of course he needed cake to keep going .. .. and Mark had been around to collect the dogs and he had some too, and Mum had some, and I had some, and then some more .. ..

No challenges to enter my cake into .. .. and I have a list of 'easy' diy jobs to do before the boys can do bigger things so crafting, and baking, will have to wait for a while longer.

Tuesday 26 November 2013

Christmas Stocking

I am loving the new pine cone die set from Marianne Design, and they work so well along with lots of other MD dies, especially these fronds I think.

It's taken me a while to put this creation together is I kept being interrupted by dogs, life and diy! Originally it was a tag but I got a bit carried away with the twiddly bits so have stuck it with 3d foam tape to make the card, although it is hard to see the original tag. The pretty patterned paper is from an old K&Co Classic stack, a bit flowery perhaps but the perfect colours for Christmas with the wine red, greens and creams.  I've inked the edges of the die and paper layers as well as the embossed areas of the die cuts with Versamagic chalk inks in Jumbo Java and Tea Leaves, you can see the effect on the pine cones and the leaf fronds.

Here's the card:

There are a couple of things I wish I could change, like the label should be around the other way perhaps but perhaps it's not noticeable .. .. and the stocking does look a bit lopsided as does the bird house - I got the tag a bit skewif there!  Apart from that though, I really like the way this one turned out.

These are the Marianne Design dies I've used:
stocking with heart and snowflake - CR1256
pine cones with branch - LR0286
leaf fronds - LRO245
ivy leaves - CR1213
bird and bird house - LR0205
flowers - CR1203, with stamens from LR0142 (large flower) and LR0122 (small flower)
tag - LR0187 with letters from a Joy alphabet die

The Charisma Cardz challenge blog have a Christmas theme running so I'll enter my card with them, and Crafty Creations' theme is for Christmas or American Thanksgiving - I've gone with Christmas then!

I am not getting around to blogging much at the moment, or crafting either.  I have been spending more time with DH, looking after the dogs and consequently going for walks, as well as getting to grips with the gluten free and dairy free way of eating.  I'm still updating my diary page if you are interested - this afternoon I am going to make a coffee and walnut sponge (DH's favourite) and a lasagna .. .. and see if my lemon drizzle cake will 'convert' although I will have to use yogurt in the mix.  I've been avoiding any dairy for the past couple of days and am happy to report no more excruciating tummy aches .. .. so it might be an experiment on the baking and eating levels to see what happens!

Friday 22 November 2013

Up-cycling!

I am late sharing my DT project for Cute Card Thursday with you as by now it's Friday!  I do have a good excuse though .. .. DH turned up Wednesday evening and took a day off work yesterday.  We went to the Eden Project as he hadn't been for many years and they are doing discount yearly passes for the locals.  We took the dogs so couldn't go into the domes, but just walking around was pleasant and enough exercise for me!  They are busy preparing for Santa's arrival this weekend and Aero was very keen to say hello to his reindeer!

Anyhow, here is my project for the CCT challenge of anything but a card, do stop by the blog to read about the prize and see the rest of the DTs creations.  I have up-cycled an old coffee jar with a big t-light in the bottom (I need to get the epsom salts to add around the base to make things more sparkly).  The sparkly organza ribbon I recently won from the Ribbon Girl and the sleigh and reindeer are Marianne Design dies that I've cut from white card then inked with blue so they would stand out a little more.  I used sleigh - LR0178 and reindeer - LR0179.


A couple more pictures so you can see the two reindeer .. .. I thought about 3 - what do you think? should I cut and add another one?  The little stars at the back of the jar are pale blue sticky back ones from my stash that I've had for ages so needed using up.  All in all a quick and cheap make for Christmas.

I am dog sitting now for the next few days as DH has gone 'up north' to visit his brother who is having an operation today, he should be back Sunday evening so I hope I last out and Piper doesn't decide to howl tonight.  I doubt I'll get much crafting done, but who knows .. .. I am still trying with the Gluten Free way and will update my page with what's happened over the last couple of days .. ..

Enjoy your weekend, and have fun with whatever you get up to!

Monday 18 November 2013

Frosty the Snowman

I've had another busy weekend with no crafting, but lots of DIY, shopping and cooking, and sharing time with family.  On Saturday DH drove us to the Farmer's Market at Bodmin Herbery where we picked up lots of lovely goodies, chatted to the stall holders and made plans for ordering the festive food.  We then went for a walk with the dogs along the Camel Trail and after a general shop at Tescos came home to find the new laminate flooring going down .. .. albeit with a few curses when things didn't quite go according to Jason's plans!  His girlfriend is on a gluten free diet, and mostly dairy free too, and as this way of eating is something I'd been thinking about trying for some time I decided to see how it would go over the weekend.  I've added a short blow by blow account at the bottom of this post if you are interested .. .. ..

I made this card on Friday but have only just got around to uploading it to my blog, it's a Serendipity Stamps snowman stamp, coloured with Copics and then lots of Stardust Stickles added for sparkle .. .. gotta be done at Christmas!


The card is a scallop base with paper scraps from an old K&Co pad plus a piece of white paper I've embossed with a swirly folder.  All the layers have been given the Stickles sparkle treatment, and my organza ribbon is also shimmery with a pretty ruffled edge. The Marianne die cuts to create a snowflake are embellished with lots of little gems, and more added to the corners of the white layer - oh yes it sparkles!  So, perfect for the Christmas Card challenge this time which is for bling! and the Papertake Weekly challenge for snow and ice. Divas by Design would like to see something snowy too, while the Crafty Little Fairies are asking you to be inspired by song .. .. Frosty the Snowman of course!  And, look what I got .. ..


I might not have a card to share with you for a while as my stash is still put away, although I have managed to get the dining room table back into the lounge so if there's no pressing DIY chores for me to tackle I might be able to get around to making something to share with you, fingers crossed!

Here's my Gluten Free diary: now tweaked and transferred to a separate page so you can keep up with me if you are interested.
Day 1 on Saturday I certainly didn't feel like snacking so much and didn't get the mid afternoon foggy head, in fact I only had breakfast (banana, Greek FF yogurt, honey and my seed mix sprinkle), a mid afternoon slice of GF bread and spread, then our evening meal of GF pasta, locally smoked GF sausages and a tomato based sauce.  I did add a little of my favourite Cornish Gouda cheese with Italian herbs .. .. and perhaps that is what caused the tummy ache later!  I browsed the GF recipe book they had brought along with them and it did explain that dairy can be a temporary problem until your gut gets back to normal and you can digest it properly again.  The symptoms are bloating and wind - oh yes we know that feeling!

Day 2 Sunday - Jason's birthday (36 years old already!) so after all his hard work on the DIY front the least I could do was make him, and us, a proper breakfast - with the GF twist of course.  We had more lovely local sausages and bacon, eggs, tomatoes and hash browns (from the supermarket, just check the labels - the ones I got were from Morrisons and had a lovely onion addition).  That set me up for the day and although DH kept asking me if I wanted a snack/lunch/biscuit etc (bad man) I really didn't feel hungry.  My brain was certainly less foggy and I managed to clean and rearrange the conservatory now that the furniture got moved back into the lounge - I even cleaned the inside of all the windows!  And swept up lots of sawdust and plaster dust that seemed to get everywhere, then prepared the evening meal of venison steaks with roast potatoes and veg, followed by apple crumble I made with the GF flour. I did start to feel tired, so Jason took over cooking the steaks and dished up the meal, it was delicious, but a little naughty again with a dollop of pepper Boursin on top of the steaks!  The down side of two days without gluten or chocolate (I can have it I just didn't feel like it!) .. .. constipation .. .. so a milk thistle tablet before going to bed.

Day 3 Monday (today) with just me and Mum here and biscuit temptation in the cupboard, but so far so good.  I had the same breakfast as on Saturday then baked beans on a slice of GF bread and spread for lunch.  I am not being as picky as the book says to be with separate toasters and watching out for cross contamination.  I have a 4 slot toaster and generally just use the 2 slots on the right hand side, so will keep the 2 slots on the left for my GF toast.  Hopefully I wont need to go down the route of cleaning and separating the contents of the cupboards and using separate utensils for the GF all the time.  The milk thistle tablets have worked but I am rather windy now .. .. perhaps the little cheddar cheese I had on top of the beans, or the milk in my coffee?  I can easily get the lactose free milk from the supermarket so that might help, and as it's only me that has it in coffee I don't mind the extra expense as long as it lasts (I wonder if it will freeze).  Giving up cheese though is going to be a BIG issue for me - I might not eat a lot of it, but I do like it little and often, perhaps not if I am going to be going out in public though if the windy situation continues!  Tonight I have a large chicken breast defrosted so I will do something with it, not sure what though.  There is left over crumble too - and the Kelly's Cornish ice cream is gluten free so a scoop of that to melt into the crumble will be perfect!  I am hoping that if I eat a good meal this evening I wont be tempted to nibble chocolate or biscuits later on - being on my own in the evenings can be a bit lonely and depressing and I know I comfort eat if I'm just watching tv.  It will be better when the tv is connected back up in the living area then I can craft at the same time so my fingers wont be tempted by the packet of biscuits or chocolate nibbles!

Thursday 14 November 2013

Angelic for CCT

This week's challenge at Cute Card Thursday is titled 'So Angelic' and as always we leave it up to you to interpret in any way you like!  Our sponsor for this challenge is Katharina at Whiff of Joy, stop by the CCT blog to read about the prize and take inspiration from the rest of the DT's creations.

For my DT card I've inked up my Lili of the Valley Christmas Angel with oval bauble then coloured with my Copic pens.  I've added a glaze pen over the little stars and dots, but as usual the shine doesn't show even though I had to take the pictures under my work light (see the shadow of the twig).

I've followed the sketch by Wench from the Sketchy Colours blog with papers from the Simple Joys Too digi collection by NitWits, but you can get a paper pad of the same name from LOTV (saves messing about with the printer too).


Here's the card.  I'm lovin' the new Marianne Design pine cones die set LR0286, and on this card I've cut the twigs and the little fat pine cones from a pale brown card then inked the embossed areas and edges with Walnut Stain DI.  The pine fronds are from LR0227 cut from bright green card to match the papers then I've dabbed them with a Pearl Dabber to look like frost.  Finally, a little red bow and the pearl dots created with my white Wacco Pearl Maker pen to correspond with the sketch.

The Addicted to Stamps challenge is to use your favourite punches or dies, my favourite pine cones and fronds then! The Creative Card Crew are looking for pearls, whilst at the ABC Christmas blog the challenge is W for Winter Wishes (I hope my card is ok with Happy Holidays for the text - it is a Winter Wish!)

Monday 11 November 2013

Santa's Helpers

I'm back! I took a few days away from crafting and the computer to spend time with DH.  It was lovely to have him around for a long weekend, even if some of it was spent shopping, working (him), gardening and DIY.

Today I am back with my 3rd card created with the Penny Johnson Santa stamps for Stampavie, and another effort at using the Fancy Labels 8s.  I've stamped the image then coloured with my Copics before cutting out the image to fit inside the medium die cut shape - but found that my plain label 8 was either too big or too small so I had to cut by hand to get the image to fit the shape properly.  A little inking around the edge hides any unevenness, hopefully, and gives a shadow at the same time.  I found some old gold card in my stash so have used that for the fancy cutting, and it wasn't too bad so I reason some card is better than others with these dies.  The base is a kraft card that I'd chopped a piece off for some reason, and rather than keep it for chopping up I went with the shape .. .. ..


Here you can see inside a little where I've added a greeting stamped onto a fancy white cut square I had in my stash, and then decorated with the Marianne die cut holly sprays.  The red paper is also from a Marianne Christmas pack, but I can't remember which one.  To finish off I found the little square green gems in my stash - they need glue so are a bit fiddly to put on, but eventually they look 'squared up' and the glue dries clear anyway!

I'm too late to enter a couple of challenges that I had in mind when I created this card, but thankfully there are plenty of Festive ones around just at the moment.  Fab 'n' Funky are looking for traditional Christmas colours, the Winter Wonderland challenge is a Christmas card for a child, and the Sweet Stampin' Challenge blog are looking for Christmas creations too.

I don't have anything else to share with you just at the moment so will probably disappear again for a few days.  I do have to get into Bodmin for shopping and would like to finish tidying the garden if the weather improves this week.  And of course there is still DIY that needs to be done .. .. I need to find someone to hang wallpaper that's been sat on top of my wardrobe for over a year, just on one wall in the bedroom, but I've decided it's too much for me and my wonky neck to tackle these days.

Thursday 7 November 2013

Animal Magic for CCT

Good morning! well it still is just .. .. I've been delayed waiting for the internet upgrade to kick in, the man has been and done whatever needed to be done so now it's a case of let's see if it works!

Here is my second card made with the cute Penny Johnson stamp for Stampavie called 'gifts for you', and my DT card for this week's Cute Card Thursday challenge 'Animal Magic'.  Our sponsor for this challenge is Nikki at Bunny Zoe's crafts, do stop by the CCT blog to see the DT inspiration and read all about the challenge.  The stamped image is coloured with my Copics, plus Stardust Stickles for Santa's fur trims and over the flakes, then I used a white pen for highlights on noses.  I've cut the image out with the fancy labels 8 die and then matted it over a plain red label 8 piece - I am determined to use those dies and this time the fancy one cut a bit better.


Here's the card.  The papers are by Marianne Design and I've added the faux blanket stitch with a white pen then simply decorated with ribbon and Marianne die cuts as the text is printed on the paper already.

I've cut the poinsettias with LR0142 and added the blue snowflakes behind (chopped up a bit to resemble fronds) from one of the flakes in LR0123.  The little red hearts are waste from a previous die cut piece, I keep the bits in a little jar waiting for a 'rainy day' when I need them!

The theme at the Squirrel and the Fox challenge is animal antics so that fit's my card too!  The Papertake Weekly challenge if anything goes with the option of Christmas, and the Crafty Little Fairies theme is Christmas in November.

Wednesday 6 November 2013

Shh! Santa's here!

Last week I stamped out 4 of my old Penny Johnson Christmas images for Stampavie and have managed to get 3 of them coloured, and 2 made up into cards - that's on the ball for me!  At least I have something to share with you for a few days, and today my first card is with Shh!  I've coloured the image with my Copic pens and added Stardust Stickles to Santa's fur trims.

 Let's see the card then .. .. ..


I've been playing around with the fancy labels 8 dies again, I'm determined to get some use out of them seeing as they cost so much!  I've created a base card and edged it with red ink, then simply added the layers. I am not happy with the way it cuts, or perhaps it's the paper that stretches on the second pass, see at the bottom there - hopefully one of the non-crafty neighbours wont mind or notice!

 Because it's so plain and simple I added the red patterned paper from Marianne Design to the inside as well with a plain 8 label to write the message on.  The text is from a MD set of banners and stamps, COL1325, and the felt die cut snowflake is from CR1227.

The Allsorts challenge is for Christmas Cheer, I think this Santa with the little pup fits that theme just right!

That's if from me today folks.  I have got my car back, and things were not as bad as expected.  The exhaust was an easy weld for my Smart man, but I did have to have a new back tyre as it was almost flat and he was too scared to pump it up as the canvas was showing in places!! How I didn't have a blow out he doesn't know - probably because I'd been driving around with it almost flat!  Thankfully it didn't cost an arm and a leg - just the leg!  I need to get out to get my happy pills, but as the weather is blowing up a storm here I am thinking one more day of being mildly depressed wont matter .. .. .. .. and I do have a couple more cards to finish off, and there's a carton of fresh chicken soup in the fridge that needs using up as well as some of those part baked rolls to cook, so I reckon there's no need to venture into the storm today!

Monday 4 November 2013

Reindeer Tag

Hi there! I have been playing with my new crafty goodies today, unfortunately I didn't finish until the light had gone so had to take the picture under my craft light - a little bit fuzzy on the focus but hopefully you can make things out!

Although this looks like a card, it is in fact a bottle tag - imagine a tent fold with a hole cut on the back piece to slip over a bottle.  As the men in my family don't go in for Christmas cards, I decided to make them a fancy tag to go with their favourite tipple.

My first play was with a Darice embossing folder made to look like cracked ice - I embossed a piece of Marianne Design paper that looks like knitting then inked over the result with Walnut Stain DI.  This piece is mounted on the green card stock and forms the base of my tag.  The next layer up is the fancy labels 8 kraft piece I've fixed at a jaunty angle with 3d foam tape then cut another piece of MD paper with the plain labels 8 to fit inside it.  I got these fancy dies a while back thinking they would complement the labels 8 dies that I rarely use, but have I had trouble getting them to cut!  The rest of the design is various die cuts using Marianne Design dies with little roses dusted with glitter and a bow tied with ribbon and twine to finish things off.

These are the dies I used:  the reindeer head LR0177 is new to me but was released back in 2011. The pine cones and twig dies are from the newly released LR0286, and the green fronds I've cut from one of the dies in the LR0227 set, the text is from LR0225, and the snowflakes are from CR1225.  I cut the pine cones, twigs and reindeer from dark brown HOTP card then used an emery board to sand back the embossed areas - I particularly like the effect on the pine cones.  I've added the same Glitz Stickles to the red text but as usual the sparkle isn't showing up too well in my picture - in real life it really twinkles!

The ABC Christmas challenge is up to the letter V for Vixen, one of Santa's reindeer so that's the theme this time around. The Creative Inspirations blog are playing bingo and I have a line with snowflakes, glitter and distressing.  The Christmas Card challenge is for dimension, to pop it up they say, well I have lots of layers popped up, the reindeer with a double layer of tape, plus all the different layers of my die cut embellishments and flowers. And one last challenge to enter, the Incy Wincy Design challenge theme is to use ribbon, twine or fibres - I have ribbon and twine on my reindeer tag.

Oops! I nearly forgot - I can enter the Marianne Design Divas challenge again too!

Saturday 2 November 2013

Winter Snow Scene

oh my is it windy here today, but thankfully the sun is shining so the combination should dry out things after all the rain we had last weekend.

My mojo is taking a holiday somewhere, so I struggled a little putting this card together, but in the end thought it was just right for sending to my oldest grandson who is now 8 years old and growing out of frills and fancies - so it's fairly plain and manly for him!

I have used the Don and Daisy stamps from Marianne Design to create the scene with skiing Don and a couple of the background stamps from the winter scenery set.  I've coloured with my Copics and added lots of loose glitter for the snow.


Here's the finished card.  I found a scrap of red striped paper in my stash and added the embossed faux stitches before inking the edges with a soft blue/grey chalk ink.  You can see I also embossed the faux stitches around my main image and the layer of embossed snow flakes too - I do it with the MD die LR0161 by moving the paper or card along the edge and running a ball tool along to create the stitches.  If anyone from MD is reading this - can you make a ruler with this design along one edge, perhaps the metal side so you could cut with a knife along the outside and emboss the stitches inside, then the measurements - it could be all metal or a mix of plastic with a metal edge. You could even have a couple of stitch designs as long as they are easy to just run along with a ball tool to create the embossed stitches .. .. I'd be happy to try it out!

Back to my card, I've cut some MD snowflakes and fixed a red dome to the centre of the big flake overhanging the image and then used the waste hearts from the big snowflake doily die to finish things off.

The Marianne Design Divas challenge blog has had a bit of a revamp and as long as you have at least 3 things by MD on your creation you can enter the monthly challenge as often as you like.  So here are the things I've used on my card:
dies: LR0161 lace edging for embossed stitches, LR0185 snowflake doily, LR0124 Norwegian Ice Star snowflakes (I used 2 from the set that sit together).
stamps: winter scenery DDS3331, skiing Don DDS3326

The postman has just delivered some new MD goodies I'd ordered; one of the new paper pads, the new pine cones die and the older Rudolph, reindeer and sleigh dies.  I am going to spend a lazy afternoon looking for inspiration on Pinterest for how to use those older dies .. .. I could get lost in there!

Thursday 31 October 2013

CCT Time to Sparkle

This week on Cute Card Thursday it's Time to Sparkle! I have added lots of Stardust Stickles to my card, but as usual it's hard to get it showing up in my pictures.  The image is Feeding Robins by Lili of the Valley and I've coloured with my Copics.  I've added white gel pen to the snow and created extra little triple flakes on the background .. .. here's the card.


After I coloured the image I couldn't find pretty papers to match, so I've just embossed a piece of pearl paper with the CB snowflake folder and added the pretty satin ribbon that in real life is a match for the little lad's jacket and wellies.  For embellishments I've cut various shapes with Marianne Design dies and finished off with the Stardust Stickles and little pearls in the centres of the flowers.

These are the Marianne dies I used:
corners - LR0143
mini poinsettias - LR0142
fern fronds (twigs) - LR0245
pine fronds - LR0227

The Created with Love challenge blog have an anything goes theme this time, the Cutie Pies are playing bingo and I have a diagonal line with flowers, ribbon and glitter.

I have the last bit of grouting to do on the kitchen floor after waiting overnight for the last tiles to 'go off' - I must say it's looking good and makes the area look twice as big!  Our electrician neighbour is away this week so we will have to wait for him to come back and connect up the under-floor heating then it will be a luxury to stand and make breakfast in bare feet!

Wednesday 30 October 2013

Vintage Christmas Card

I'm calling this a vintage Christmas card, but it's actually a hanging decoration that I could write a message on the back and send to a friend .. .. and I just think of it as vintage in style because of the colour scheme of soft brown and ivory and the style of the stamp.

I've been drawn to the Viva Decor My Paper World sheets of silicone stamps as a way of challenging myself to stamp in a new style without spending a fortune.  Cuddly Buddly has the best collection and I have a wish list for more!  Most of the images don't need colouring so in theory should make for quicker creations, unfortunately the stamping was rather stressful.  This image isn't a particularly good one with dimples in the silicone on the bird bodies, then there was the issue of ink and paper.  Some while ago I saw a post on Splitcoast Stampers that recommended using chalk ink with this type of stamp and I must say it was the best giving me a clear edged image, although I had to do some careful inking and pressing to get a good enough impression of the birds due to the dimples.  I used Versamagic chalk ink in gingerbread to stamp the birds, then Sahara sand to ink around the edges and also to highlight the embossed areas on my die cuts.


Here's a closer view.  I've added the pearls with my ivory Wacco pearl maker pen, and the ivory organza ribbon for the double bow and hanging loop.  Other than that everything else is just card and ink to create the layers I've fixed together with 3d foam tape.  My die cuts are by Marianne Design and the main pieces were designed by Petra van Dam:

Petra's Squares - LR0234
Petra's Large Ovals - LR0240
Holly sprays - LR0244

There's an anything goes challenge at the Die Cuttin' Divas blog so I will enter my festive decoration with them.  Crafty Creations would like to see something made by yourself so I can enter my Christmas decoration with them too.

Well, it will soon be lunch time and as Jason has laid most of the kitchen floor tiles for me, it's now my turn to get down and get dirty with the grout!  I wonder if there's a crafty use for left over grout .. .. ..?

Friday 25 October 2013

Wee Berry


At last I have a card to share with you!  It's been 4 weeks since I last posted, and although work has been slow here on the DIY front, things have been happening.  I've given up waiting for the work to be finished and moved the dining table back into the living area so I can at least have a work space .. .. but I have to keep going backwards and forwards to my stash in cupboards and boxes all over the house!

This card was started ages ago with some of the Nitwit magazine freebie papers and I added the faux white blanket stitches with a white marker.  I even added the die cut mittens and the gingham bow, but what I had planned just wasn't working so it got put away .. .. until today.  I had managed to get the cute Wee Berry printed off some time back, although the printer is definitely on the blink as I can see areas of missing lines (don't look too closely) and the image came out bigger than usual for me.  Any how, I coloured her in then got to fussy cutting her out with the idea of using her on this card .. .. I had to carefully move one of the mittens and cut it to fit on top of the other one to free up some space, and unfortunately the red paper tore a little but with some glue and the text to hide it you'd never know!  To anchor Wee Berry I stood her in front of the die cut trees then finished things off with the snowflakes and the pearls created with my Wacco pearl pen.

The die cuts are all made with Marianne dies, here's the list:
mittens - CR1255
snowflakes - CR1256
trees - LR0136

Now I'm not too sure what challenges are running at the moment, but a quick check down my reading list and I saw that the Christmas Stamping All Year Long challenge was to use everyday patterned papers (nothing linked to Christmas) on your creation - well my papers fit with that theme.  The Winter Wonderland theme is for checks - my gingham ribbon and the red patterned paper has a large check pattern, even the blue paper is sort of checked!  I am sure there are others but my list has frozen up again .. .. hopefully on 7th November the engineer will connect us up to faster broadband! Fingers crossed my steam driven pc will cope with it otherwise I'm going to have to save my pennies for a new pc as well as a new printer - Yikes!

Friday 27 September 2013

Batty Boo!

This cute image is the Batty Boo! digital version from Sylvia's Wee Stamps - you can find it here.  I had printed it out last year but never got around to creating anything with it, so before my stash got put away I had a play.  The image is coloured with my Copic pens and rather than do a Halloween card, I've made it Autumnal instead with lots of Marianne Design die cut leaves.


The colours are looking washed out as I had to take the picture with the lamp on - that pumpkin is actually quite orange!  The paper is also more orange and is a Nitwits digi design I use quite a lot but can't get to my stash to see what pack it's from.  I've added the faux blanket stitch edge with a black marker pen as I had planned to have this as my DT card for the Totally Papercrafts blog, sadly though I've had to step down from the team as I just don't have the time to commit to creating and commenting each week - but instead I can go back to entering the challenges!

Just a couple of Marianne Design dies on this card, the ivy spray is from LR0206 and the maple leaves are the smaller die from LR0255.

Die Cuttin' Divas are looking for Fall colours this time around, as are the Created With Love team.  Over at the Fairy Tale challenge blog they are looking for pumpkins, mushrooms and/or bats this time - perfect!

A quick update on the DIY home front - we are now all plastered and the coving on so looking good.  Now I just need some fine days with a bit of a breeze so I can open all the windows to help get it dried out.  Jason is much better on the medication and managed to get back in his car - so he's off to spend the weekend with his girlfriend and look around the DIY stores in Plymouth.  It's the big craft event at Westpoint, Exeter on until Sunday .. .. I would love to go but although it's not so many miles away, getting there from here would take a couple of hours at least and I certainly can't do that each way on my own and spend a day at the show.  So, yet again I'm having to miss out seeing my friends - if you are going, have a great time and let me see what stash you get!

Thursday 26 September 2013

Pretty Ribbons

The theme this week at Cute Card Thursday is 'pretty ribbons' and we have a new sponsor for this challenge: Crafty Devils, a UK store based not too far away over the border in Devon, but sadly I've never been to it .. .. perhaps a day out is in order then!  I had a quick look at their web shop and there's lots of lovely crafty stash in there so once I've finished my post I'll be putting the kettle on for a cuppa and a leisurely browse.

I can't do much else today as there are two men in the living space .. .. the ceiling is plastered and looking good, if a bit pink! They are making a start on the walls so hopefully they will be finished by tomorrow evening.  Then it's a case of waiting for the plaster to dry before deciding what to do next.  Unfortunately Jason is in agony and off work with a painful back - the doctor says it's just lots of muscle spasms and to rest, take anti-inflammatory pills and pain killers, and not to move any more furniture for a while!

Back to my card .. .. the image is one of my new Lili of the Valley stamps called Nativity Angels and I coloured with my Copics in pale neutral shades then got stuck for putting things together .. .. I hope it all works, what do you think?


Yet more of the freebie Nitwit papers - can you see how I was going for that beige colour rather than the red or blue shades.  When it came to embellishments though I had to add in a little colour so after die cutting the poinsettia from some matching beige Nitwit paper in my stash, I added the blue die cut snowflakes and leaves, and the tiny blue pearls.  Finally, as it's a ribbon challenge I tied a multi bow from narrow red satin ribbon and added a couple of loops behind the flower too.

These are the Marianne Design dies I've used on this card:
mini snowflakes from the Christmas Stocking die (and I still haven't made anything with the stocking) - CR1256
poinsettia - LR0122
leaves - LR0227 & LR0192 (bottom spray with inked embossed areas)

The Fussy and Fancy Friday theme is to use punches and dies on your creation and at Creative Inspirations they would like you to use your favourite stamp brand - Lili of the Valley! There are others I like too but I have more Lili's in my stash now than any other brand!

Wednesday 25 September 2013

Boy Sledging


Good Morning!  As promised, I have a card to share with you today.  I treated myself to this charming little lad on his sled with his best friend, a stamp from Lili of the Valley.  I've coloured the image with my Copic pens and created my DT card for the Stampavie and More challenge - yes we are back!  The theme is flowers and the challenge runs for two weeks.  Our DT is a little thin on the ground just now so we might be looking out for a few more teamies very soon, so why not come and join in with our challenge!


Here's my card - the base is cut with a Frilly #10 and I've used a piece of the red spotty Nitwits magazine freebie paper .  There's sparkle on the snow, plus little triple dotty snowflakes I created with a white gel pen for added interest in the 'white space' on the image.  To embellish I've die cut various bits and bobs with my Marianne dies and finished off the flowers with little blue pearls.

These are the Marianne dies I used:
mini poinsettias - LR0142
leaves from - LR0226 & LR0227
snowflakes - CR1225, CR1226 & CR1256

The Christmas Stamping All Year Long challenge is for anything goes, but Christmas and stamping of course.  Crafty Hazelnut's Christmas challenge is to use stamps - my image and text are stamped, and the Cutie Pie challenge theme is 'one for the boys' - my little chap sledging just might go to one of my grandsons, and finally, the challenge at Totally Gorjuss is going dotty - I have dotty paper, dotty snowflakes and pearl dots in my flowers as well as dots embossed on the snowflakes.

Tuesday 24 September 2013

clickity click

No card to share today, but I do have a couple for later this week.  Instead, here is a picture of the cushion I've made, styled on my bed with my teddy bear - well you are never to old to have a teddy bear in bed with you, are you?

The wool is a DK weight I bought ages ago to knit a jumper for my grandson, needless to say he grew out of the Grannie's knitted jumpers stage and so the yarn got left in a box.  I have several other colours and weights too, so will be looking out for more ideas to use up the stash.  The pattern for the cushion was in a Woman's Weekly magazine back in the last century .. .. I tore it out thinking one day I might get around to making the cushion, and that day came!  At the moment the pad inside is looking a bit big, but I am sure it will squash down and then the buttons wont be straining so hard to keep the thing closed.

Just a note: ted is a 'Boyd's Bear' - I think called James but I'm not 100% sure and the ticket is put away 'somewhere safe' - and you know what that means!  He is a few years old now and came from the teddy bear shop in Padstow, here in Cornwall. His trousers have faded over time, originally they were an aqua colour similar to the cushion, and his jumper has stretched a bit - and no I didn't knit it although I used to do a little Fair Isle knitting many years ago and still have a little girl's cardi I made for my granddaughter but never got to finish before she got too big!  No more granddaughters so perhaps I will finish the lace edging and offer it up to a good home .. .. ..

Well, we are just about ready for the plasterer - he phoned to say he was delayed but would be here tomorrow morning .. .. I do hope so as I can't get to any of my paper crafting stash without serious risk of back injury.  Jason and our kind electrician neighbour have sorted out the electrics for now, but there will be more electrical work to do fitting spots in the kitchen ceiling and connecting the rewiring for the remaining lights once things are dry and painted.  My big problem now is making a decision on a paint colour for the walls that will sit with the Laura Ashley roman blind I made for the kitchen window, it's in shades of eau-de-nil, off white and pale stone - should be easy then!  The sofas are a dark brown leather and the kitchen work top is a brown/beige/white imitation marble laminate with kitchen units in an oak effect shaker style.  The blinds at the large windows either end of the sitting/dining area are white verticals, and the dining furniture is a 'teak' solid wood from Africa that my parents were given as a wedding present - all I know is it's very solid so not easy to shift about!  We are going to be laying the same laminate floor as in the new build area, a white oak effect finish, and the kitchen area will be tiled in a pale beige ceramic.  So, with the mix of styles, wood and wood effects, I'm thinking a fairly neutral pale shade of beige is going to be the best option .. .. perhaps Dulux Nutmeg White if they still make it.  From experience their 'white' shades have more colour in them than shows on the paint chart - I have Jade White for my bedroom and Mum has a Lilac White in hers and both are definitely a colour - if you get what I mean.

Monday 23 September 2013

Die Cut Christmas

Hello again!  I just have a little C6 Christmas card to share with you today created with Marianne Design die cuts.

Talking of stash .. .. it has been out of the sideboard so we could move the solid wood thing, then I had to squeeze into the porch to put the boxes back, before the dining chairs got stacked in front of it.  So, there is no way I'm going to be able to get to my stash for at least a week, possibly longer if we decide to wait until the floor is laid and decorating done before bringing the furniture back in.  I do have a couple of cards put by to share with you in the coming days - but sadly after that I will be painting walls, skirtings and doors rather than anything stamped!

I can't remember the name of the paper pack that I used to create the card, if you really want to know I am sure it will be available still from your Marianne Design retailer. The dies I used to create the card are:

icicle border LR0135
fronds LR0245
mini poinsettia LR0142
Merry Christmas LR0225
snowflake LR0124  and CR1227
Christmas tree layers CR1227

To finish things off I've added the little blue gems.

Well, I couldn't find any challenges that my card would fit - the two Christmas challenges that I quite often enter both need stamps this time around, and my card is stamp free!  Now I must get back to clearing and dusting again, ready for the plasterer to get on with his job and to try and limit the amount of dust we consume with each mouthful of food and drink, or inhale with each breath of air - why is it bare walls and floors just exude dust all the time?

Thursday 19 September 2013

Fairy Nice Christmas

This week on the Cute Card Thursday blog our theme is 'Fairy Nice' and as always we leave the interpretation of the theme up to you.  Our sponsor for this challenge is Whimsy Stamps so fly on over to the CCT blog for the details and DT inspiration.


I have inked up one of my new LOTV stamps, although she isn't new to LOTV but somehow I forgot to order her earlier!  I have coloured the cute Christmas fairy image with my Copics then added Stardust Stickles to her wings and the stars, and a white gell pen over the polka dots on the bauble bow.

Here's the card:

The papers are more from the Nitwits freebie pack in Simply Homemade magazine and I have just added the little texts from Cuddly Buddly that have been in my box an age, a scrap of gross grain ribbon tied in a bow, and various Marianne Design diecut bits and pieces to create the embellishment, finishing things off with tiny blue pearls.

The Marianne Design dies I've used for this card are:
mini poinsettias - LR0142
spiky fronds - LR0226
edge to the plaid layer hidden under the flowers and fronds, plus the bit under the bow - LR0270
the little red hearts are the waste from the heart die in the new stocking set - CR1256

The Creative Craft challenge is to include some ribbon on your project and is being sponsored by LOTV for this challenge, so I just have to enter my card with them!  At Created with Love it's an anything goes theme, and the Flutterby Wednesday theme is also anything goes with a fairy or butterfly on it, whilst at Crafty Cardmakers it's for winged things!

And thank you to Claire for leaving me a lovely comment on this card, and when I went to check out her blog she had a reminder that the Christmas Cards All Year blog challenge for September is for Christmas fairies with a touch of sparkle - so another one to enter!

Tuesday 17 September 2013

A Christmas Carol

Finally I'm able to post this card!  I have been packing up my craft stash then gradually bits and pieces come out of the cupboard or one of the boxes, and then I have to clear up again .. .. I tell you - being a tidy crafter is just not me!  The good news is that the plasterer is booked for next Tuesday, all the wallpaper is stripped except for behind the radiator and that we are leaving 'till the last minute as we want the heating on in the evenings.  The skip was delivered yesterday and is already almost full with the building debris that was in the garden, let alone anything we might find in the garage, the shed or from the latest diy challenge. Jason has some channeling out to do for the electrics and to build the boiler cupboard - but he tells me "that's no big deal and will be done in time .. .. .. so stop worrying!"

So, to my card - this is one of my new Lili of the Valley stamps, called a Christmas Carol and I've coloured with my Copics along with a white pen to hightlight the snowy accents.

Here's the card:


I've used paper and die cuts by Marianne Design to embellish my card, adding the embossed faux stitiching and inking the edges with a brown Versamagic chalk ink.  The little pearl flower button is from my stash and the pearls on the mittens and edge of the card are made with a cream Wacco pearl maker pen.

This is the list of Marianne Design dies I used on this card:
faux stitches - LR0161
skeleton flower and leaves - LR0156
pine boughs - LR0227
mittens - CR1255

I'd like to enter my card in the Oldie but a Goodie challenge to use dies or punches - and my old things are the dies that cut the flower and skeleton leaves and the Marianne Design patterned papers I got for last year's Christmas cards so am now using up.  Over at the Marianne Design Divas blog it's an anything goes challenge, so as I have the patterned papers and die cuts from MD, I'll enter my card. And, the Creative Card Crew have a Christmas challenge and on the Christmas Card challenge blog the theme is to include music with your creation -  so here's mine for them too!